Leveling Up Call and Video Quality
I often get comments, and sometimes questions, about my Zoom and video lecture setup in my office. In this post, I want to talk a bit about it, my choice of equipment, and things that can improve the quality of video recordings, remote teaching, and videoconferences.
There are a few key pieces to this:
- Audio quality (microphone)
- Video quality (camera)
- Lighting
- Software
- Headphones and Monitors
- Additional Useful Bits
Additional, much more expensive investments — like soundproofing room treatments — can really up the game, but I’m going to leave those out of scope. There is a lot you can do without remodeling your house.
With few exceptions, I’ve actually used the products I talk about here, most of them fairly extensively. For a quick TL;DR, here are a few good choices:
- For a reasonably-priced, relatively portable setup, get the Jabra Evolve 40 headset and use your laptop or phone camera. The Jabra mic isn’t as good as the Yeti or Shure, but it provides clear audio without Bluetooth artifacts or picking up the rest of the room.
- For a good and moderately-priced upgrade for a stationary office setup, I recommend the Yeticaster, the Anker PowerConf C200 webcam, and a comfortable set of headphones. The Shure MV5 is also quite good, and is more compact and less expensive than the Yeti.
Microphones
Audio quality is, in my opinion, the biggest boost to video recording or conference quality — visuals are good and important, but sound quality is vital to making sure you are clearly understood. A good quality microphone setup will do a few useful things:
- Clearly capture your voice.
- Not capture other sounds in the background.
There are other things you probably want to consider as well, such as form factor, size and weight, and price; different ones will also fit different spaces better. I currently use 3 different microphones for my home office, university office, and on the go. Microphones are also a place where Wirecutter’s recommendations are pretty good.
I also recommend a microphone setup that connects to your computer with USB rather than the microphone jack: this keeps the analog audio processing circuitry separate from your computer to reduce EM noise interference with your audio signal. MacBooks have pretty clean audio processing, but PCs can be a mess in that regard.
For capturing just your voice, either for a recording or a conference call, you probably want a cardioid microphone: the microphone’s pickup pattern focuses in front of the mic, with little response to sound from the sides or rear; this improves sound isolation (while requiring you to be somewhat careful how you position the mic). For other contexts, you need other pickup patterns: for a group of people, for instance, you need an omnidirectional microphone.
If you watch video podcasts, you probably see 2–3 microphones a lot: the Blue Yeti, the Shure MV7, and the MV7’s older and larger brother, the Shure SM7. Both the Yeti and the MV7 are excellent microphones. I haven’t used the SM7, but assume it is quite good; it is most often used for vocal recording in studio environments, while it is my understanding that the MV7 is designed for use in less sonically refined spaces like offices with poor sound isolation, and from my experience it is very good in them.
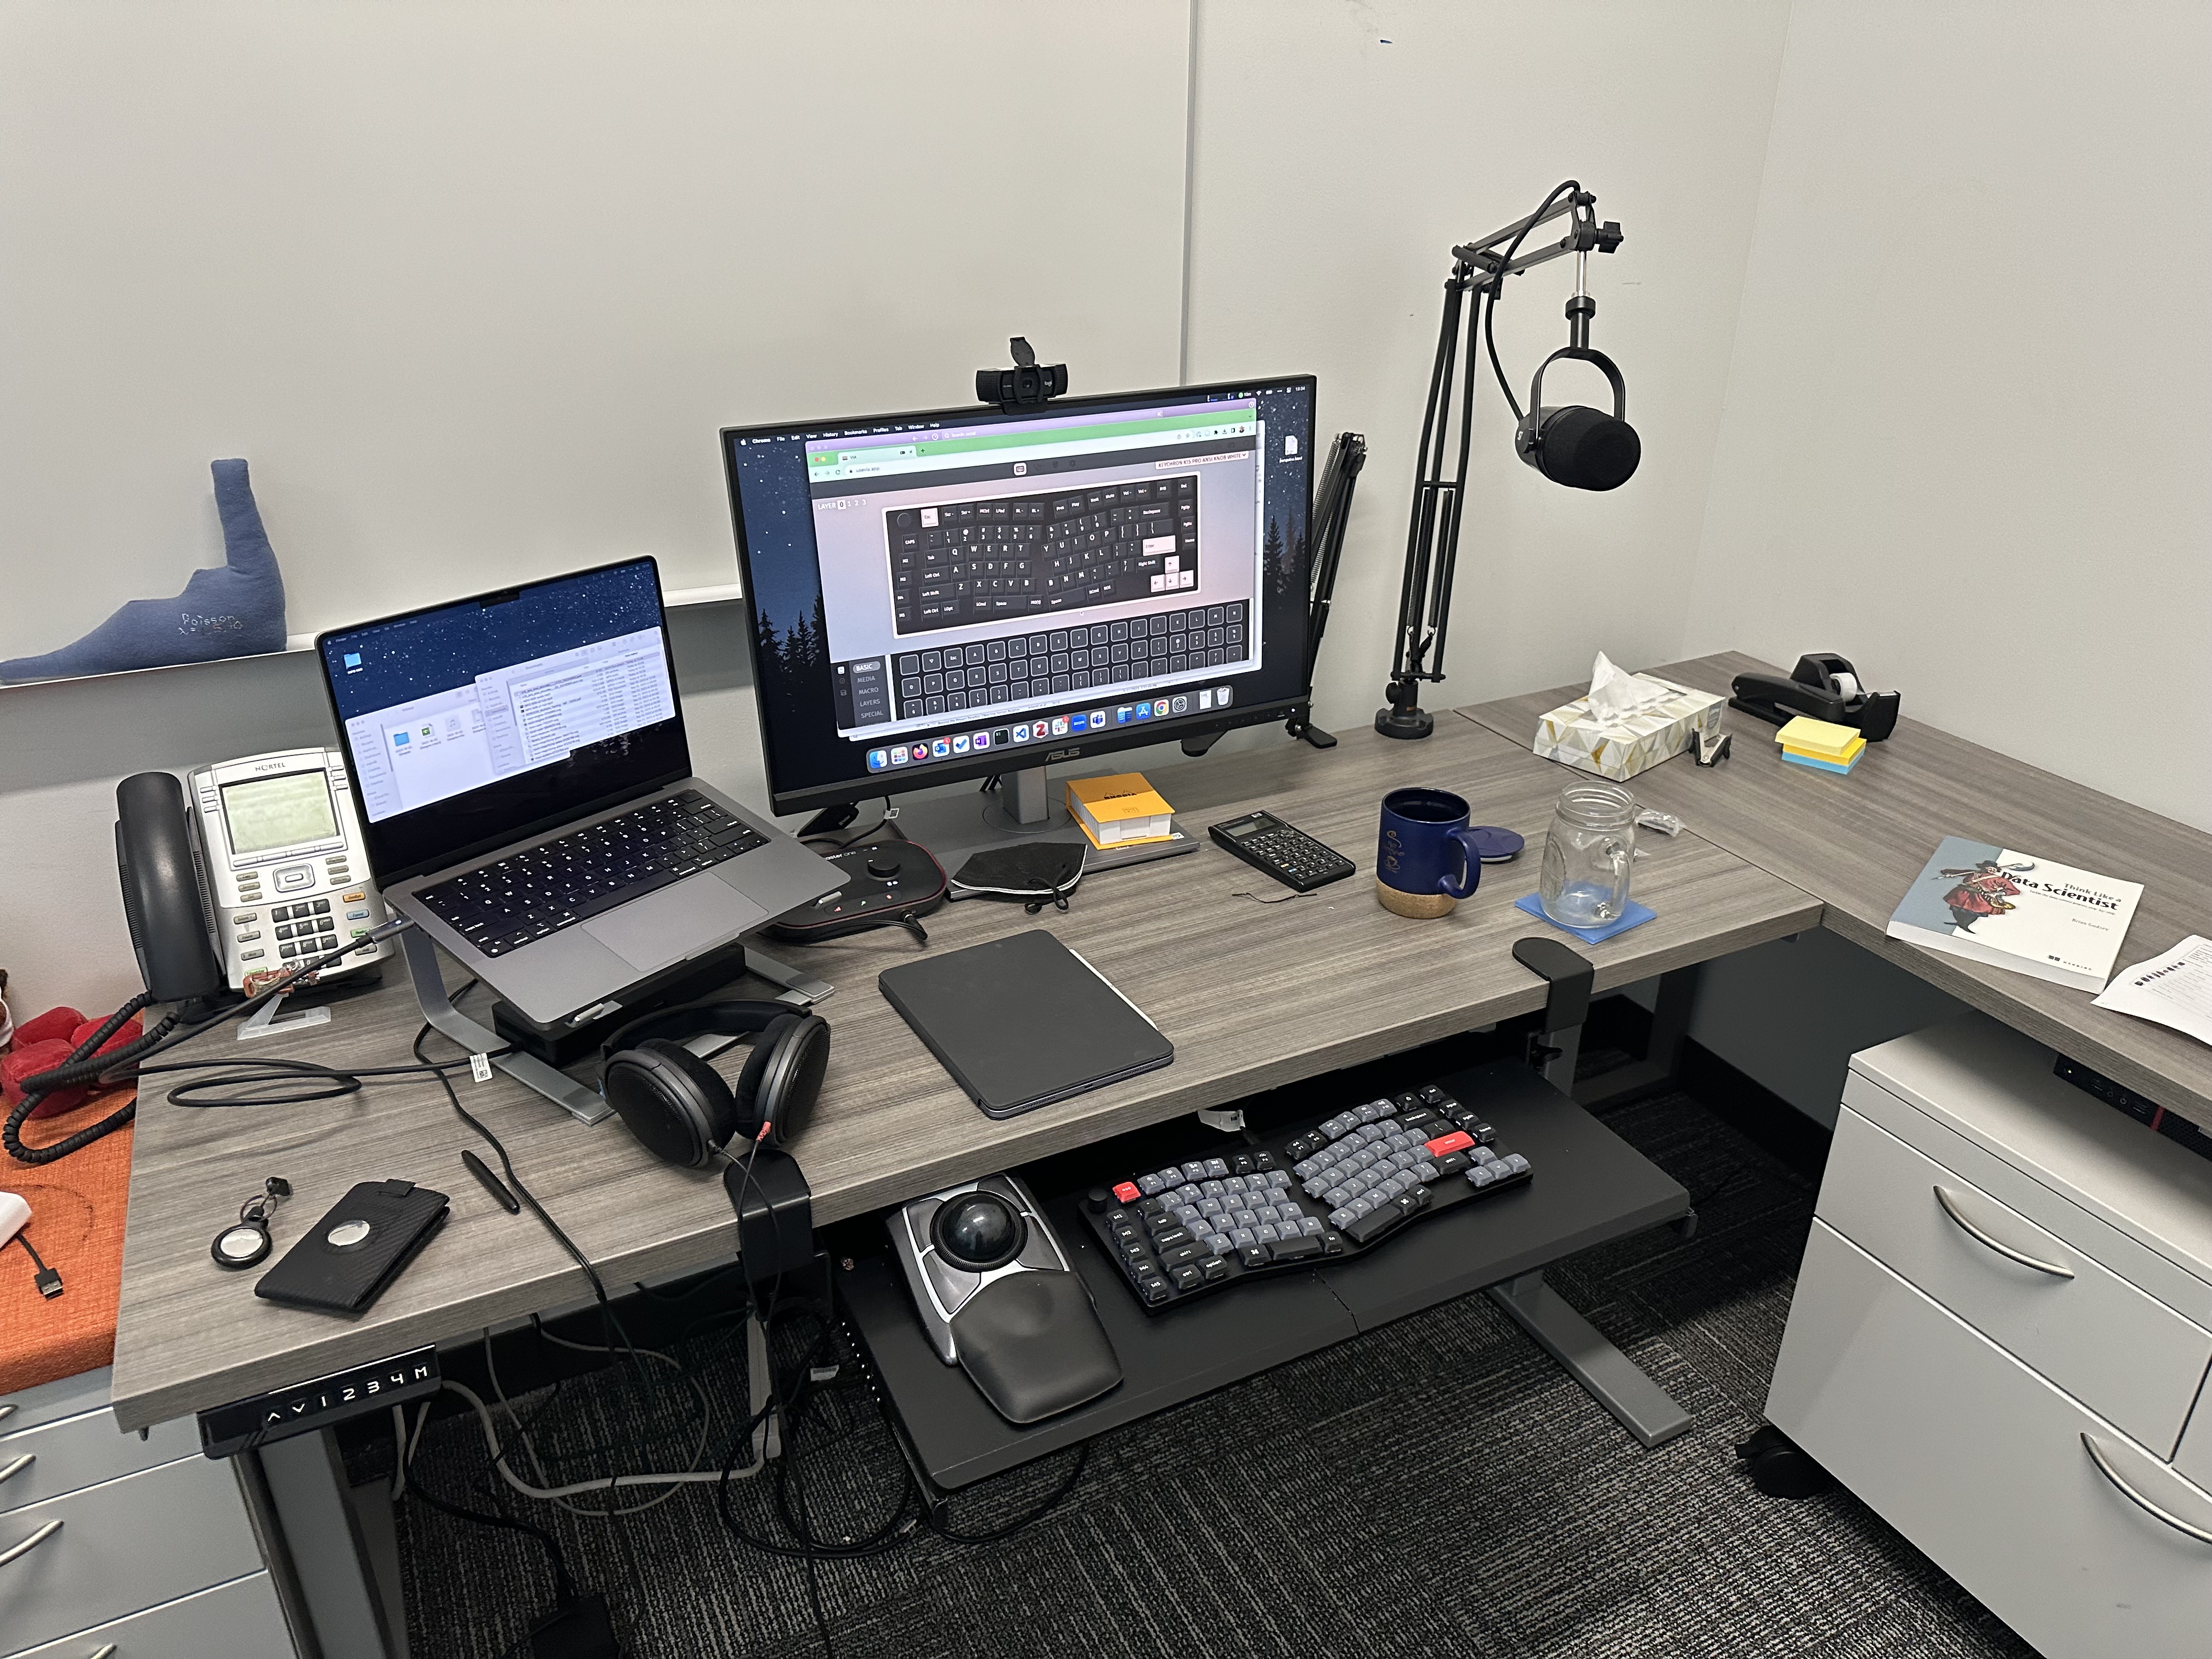
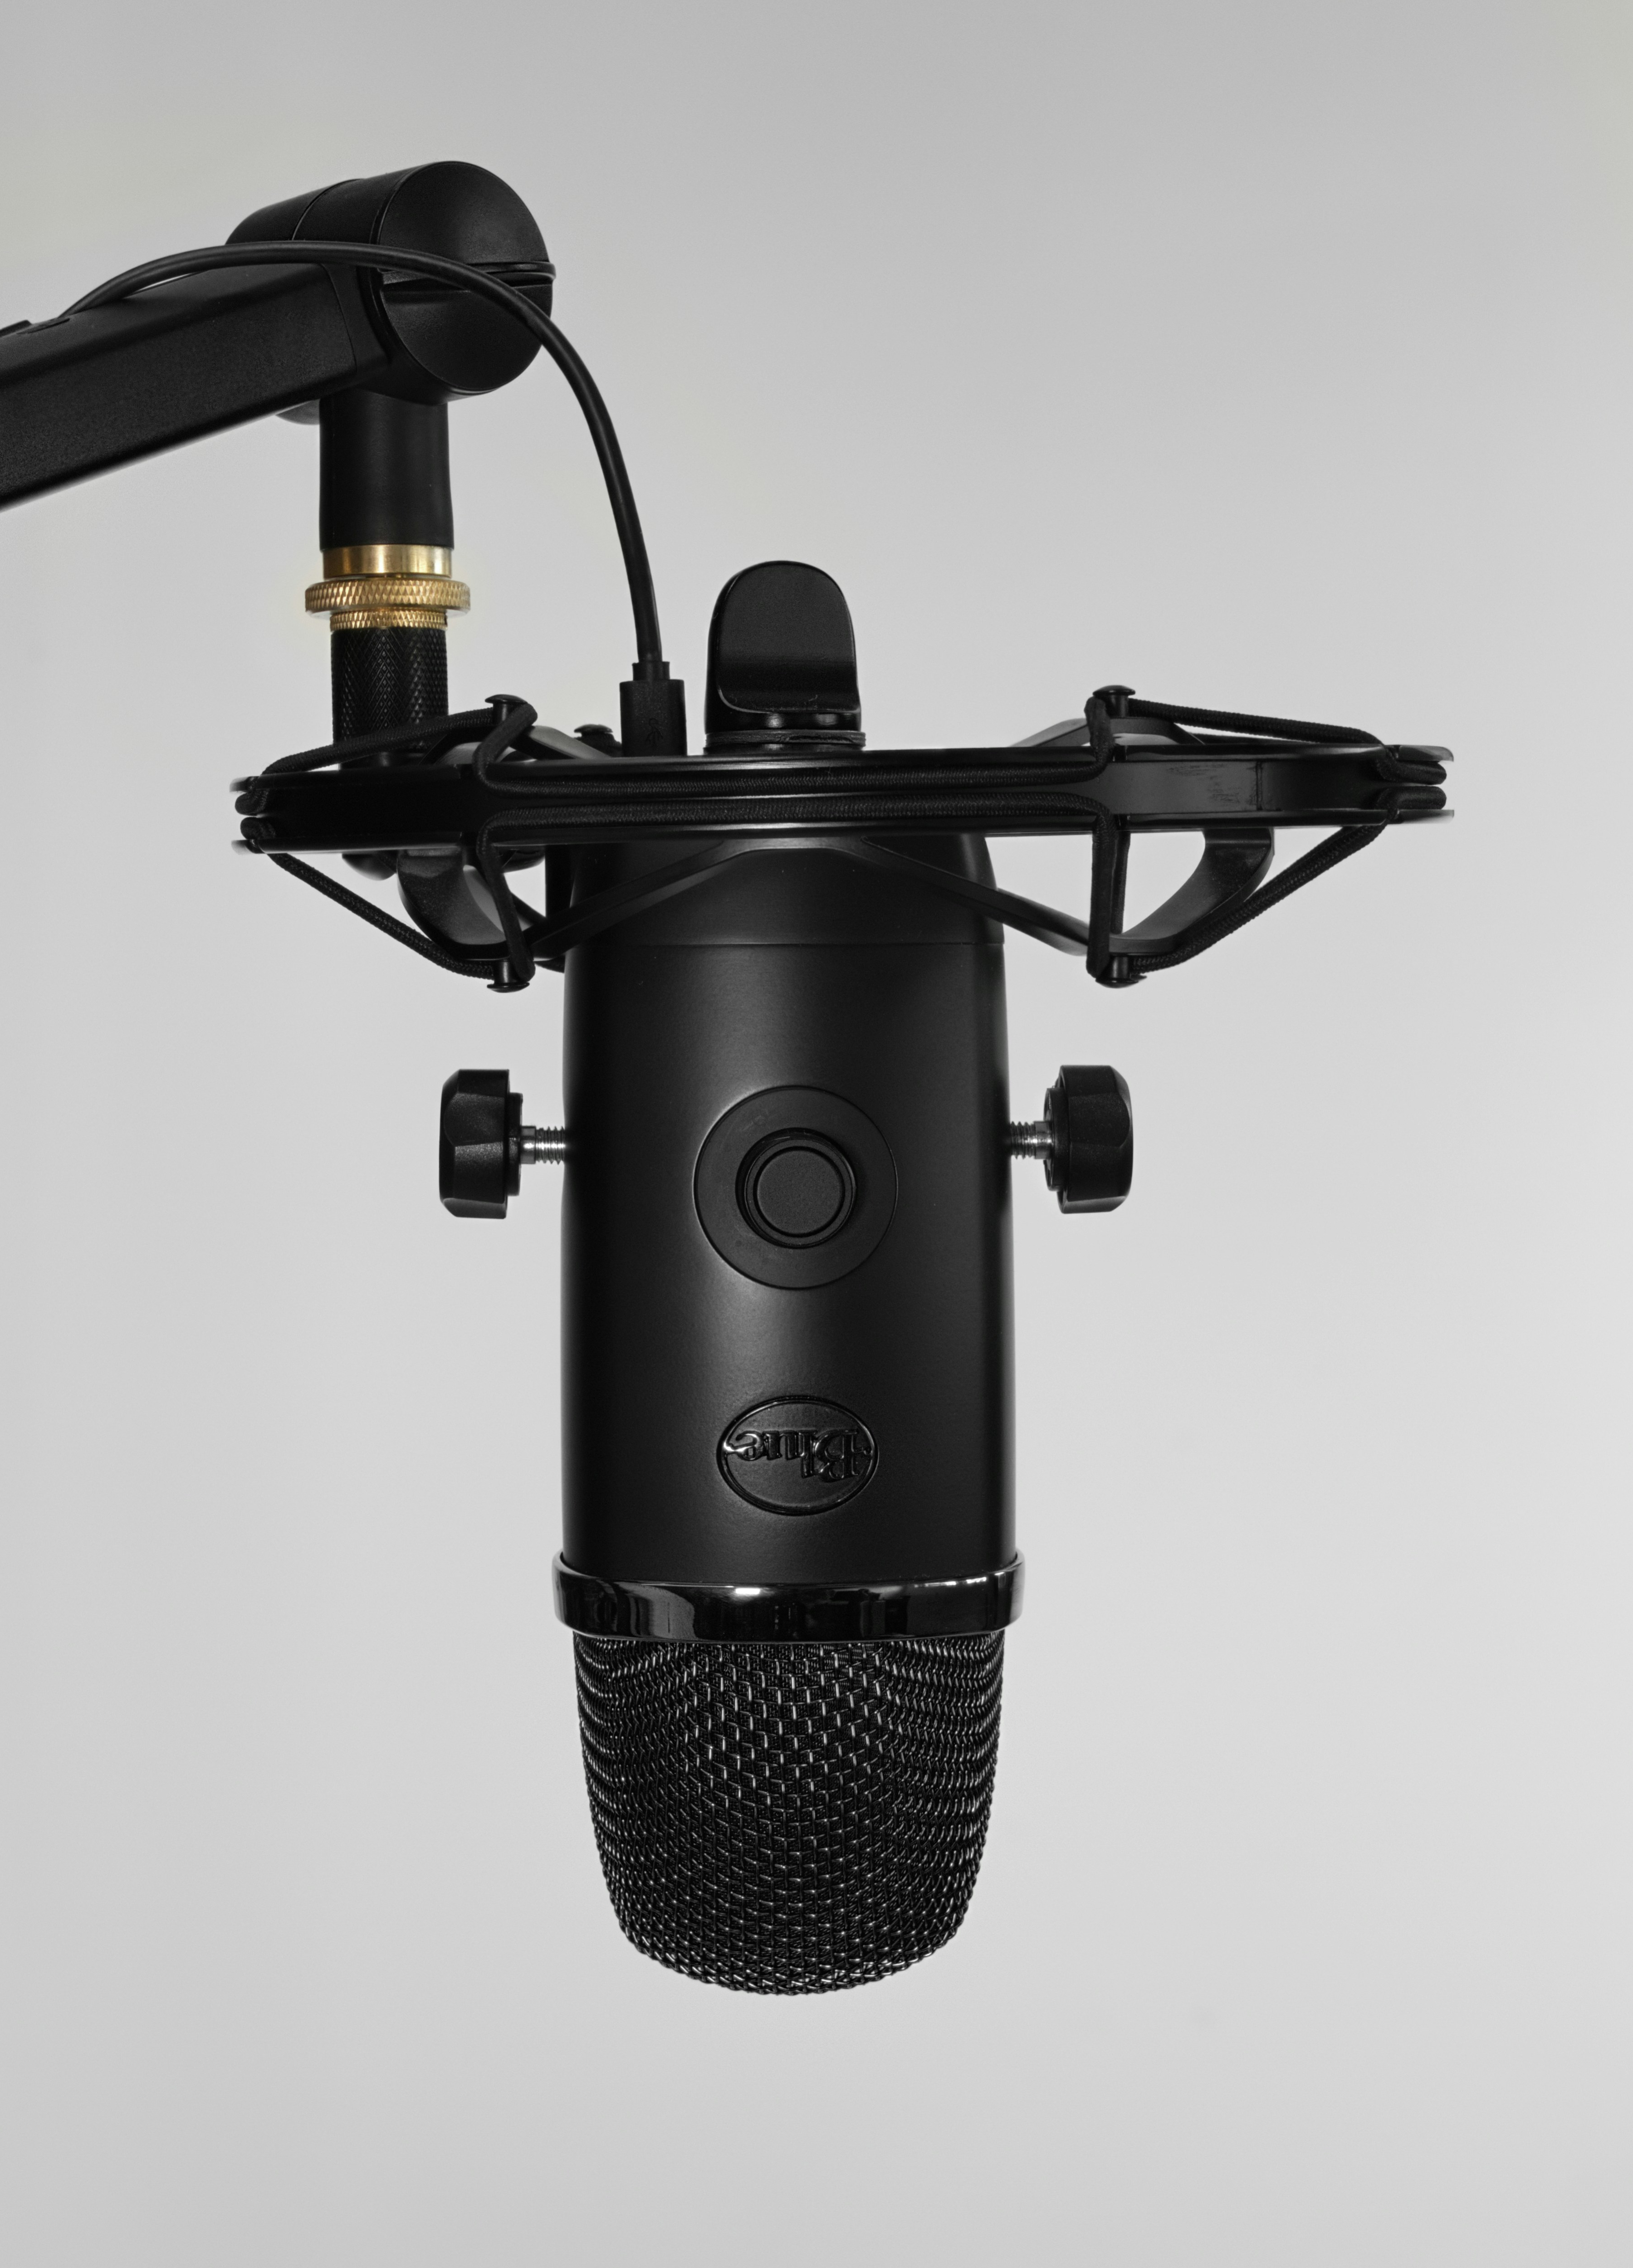
Blue Yeti
I used the Yeti for several years at Boise State, including to record my data science lectures. Mine was in the Yeticaster configuration, with shock mount and boom arm; a boom arm helps you position the mic closer to your face to make it easier to pick up your vocals without background noise, and the shock mount reduces the amount of keyboard clicks, desk jostles, etc. that make it into the sound. I found both the sound quality and the sound isolation of the Yeti to be excellent, and it did a very good job of capturing my voice without also recording our furnace’s attempt to mimic a malfunctioning jet-powered freight train. The Yeti is also a very flexible microphone, with 4 different pickup patterns: the cardioid is good for recording and conferencing, while the bidirectional and omnidirectional patterns are good when you want to record both yourself and a guest with one mic.
I generally recommend the Yeti for people looking to upgrade a stationary office setup. The combination of sound quality and flexibility is good for most people (starting to sound like Wirecutter here, I know…). It’s also relatively reasonably priced (often $100–130 for the mic itself; the Yeticaster setup lists for $199 but I’ve seen it on sale on Amazon for $130–150). It is important to note that when the Yeti is in cardioid mode, the front of the mic is the front side, not the tip. The Blue logo should face you, and you talk into the side of the microphone.
Whether you should get a desktop stand or a boom stand depends on your preferences and the constraints of your desk space. I like the boom stand, both to get the microphone closer to my mouth and to not take up as much desk space; the boom also swings out of the way when not in use. It does occlude vision a little, but I got used to that and have no problem seeing my monitor with the mic in my peripheral vision. Note that the Yeticaster configuration consists of the Yeti microphone, the Compass boom arm, and the shock mount, but does not include the desktop stand that you get if you just buy the Yeti on its own. The Yeti also has a standard 5/8” threaded base for mounting on other stands.
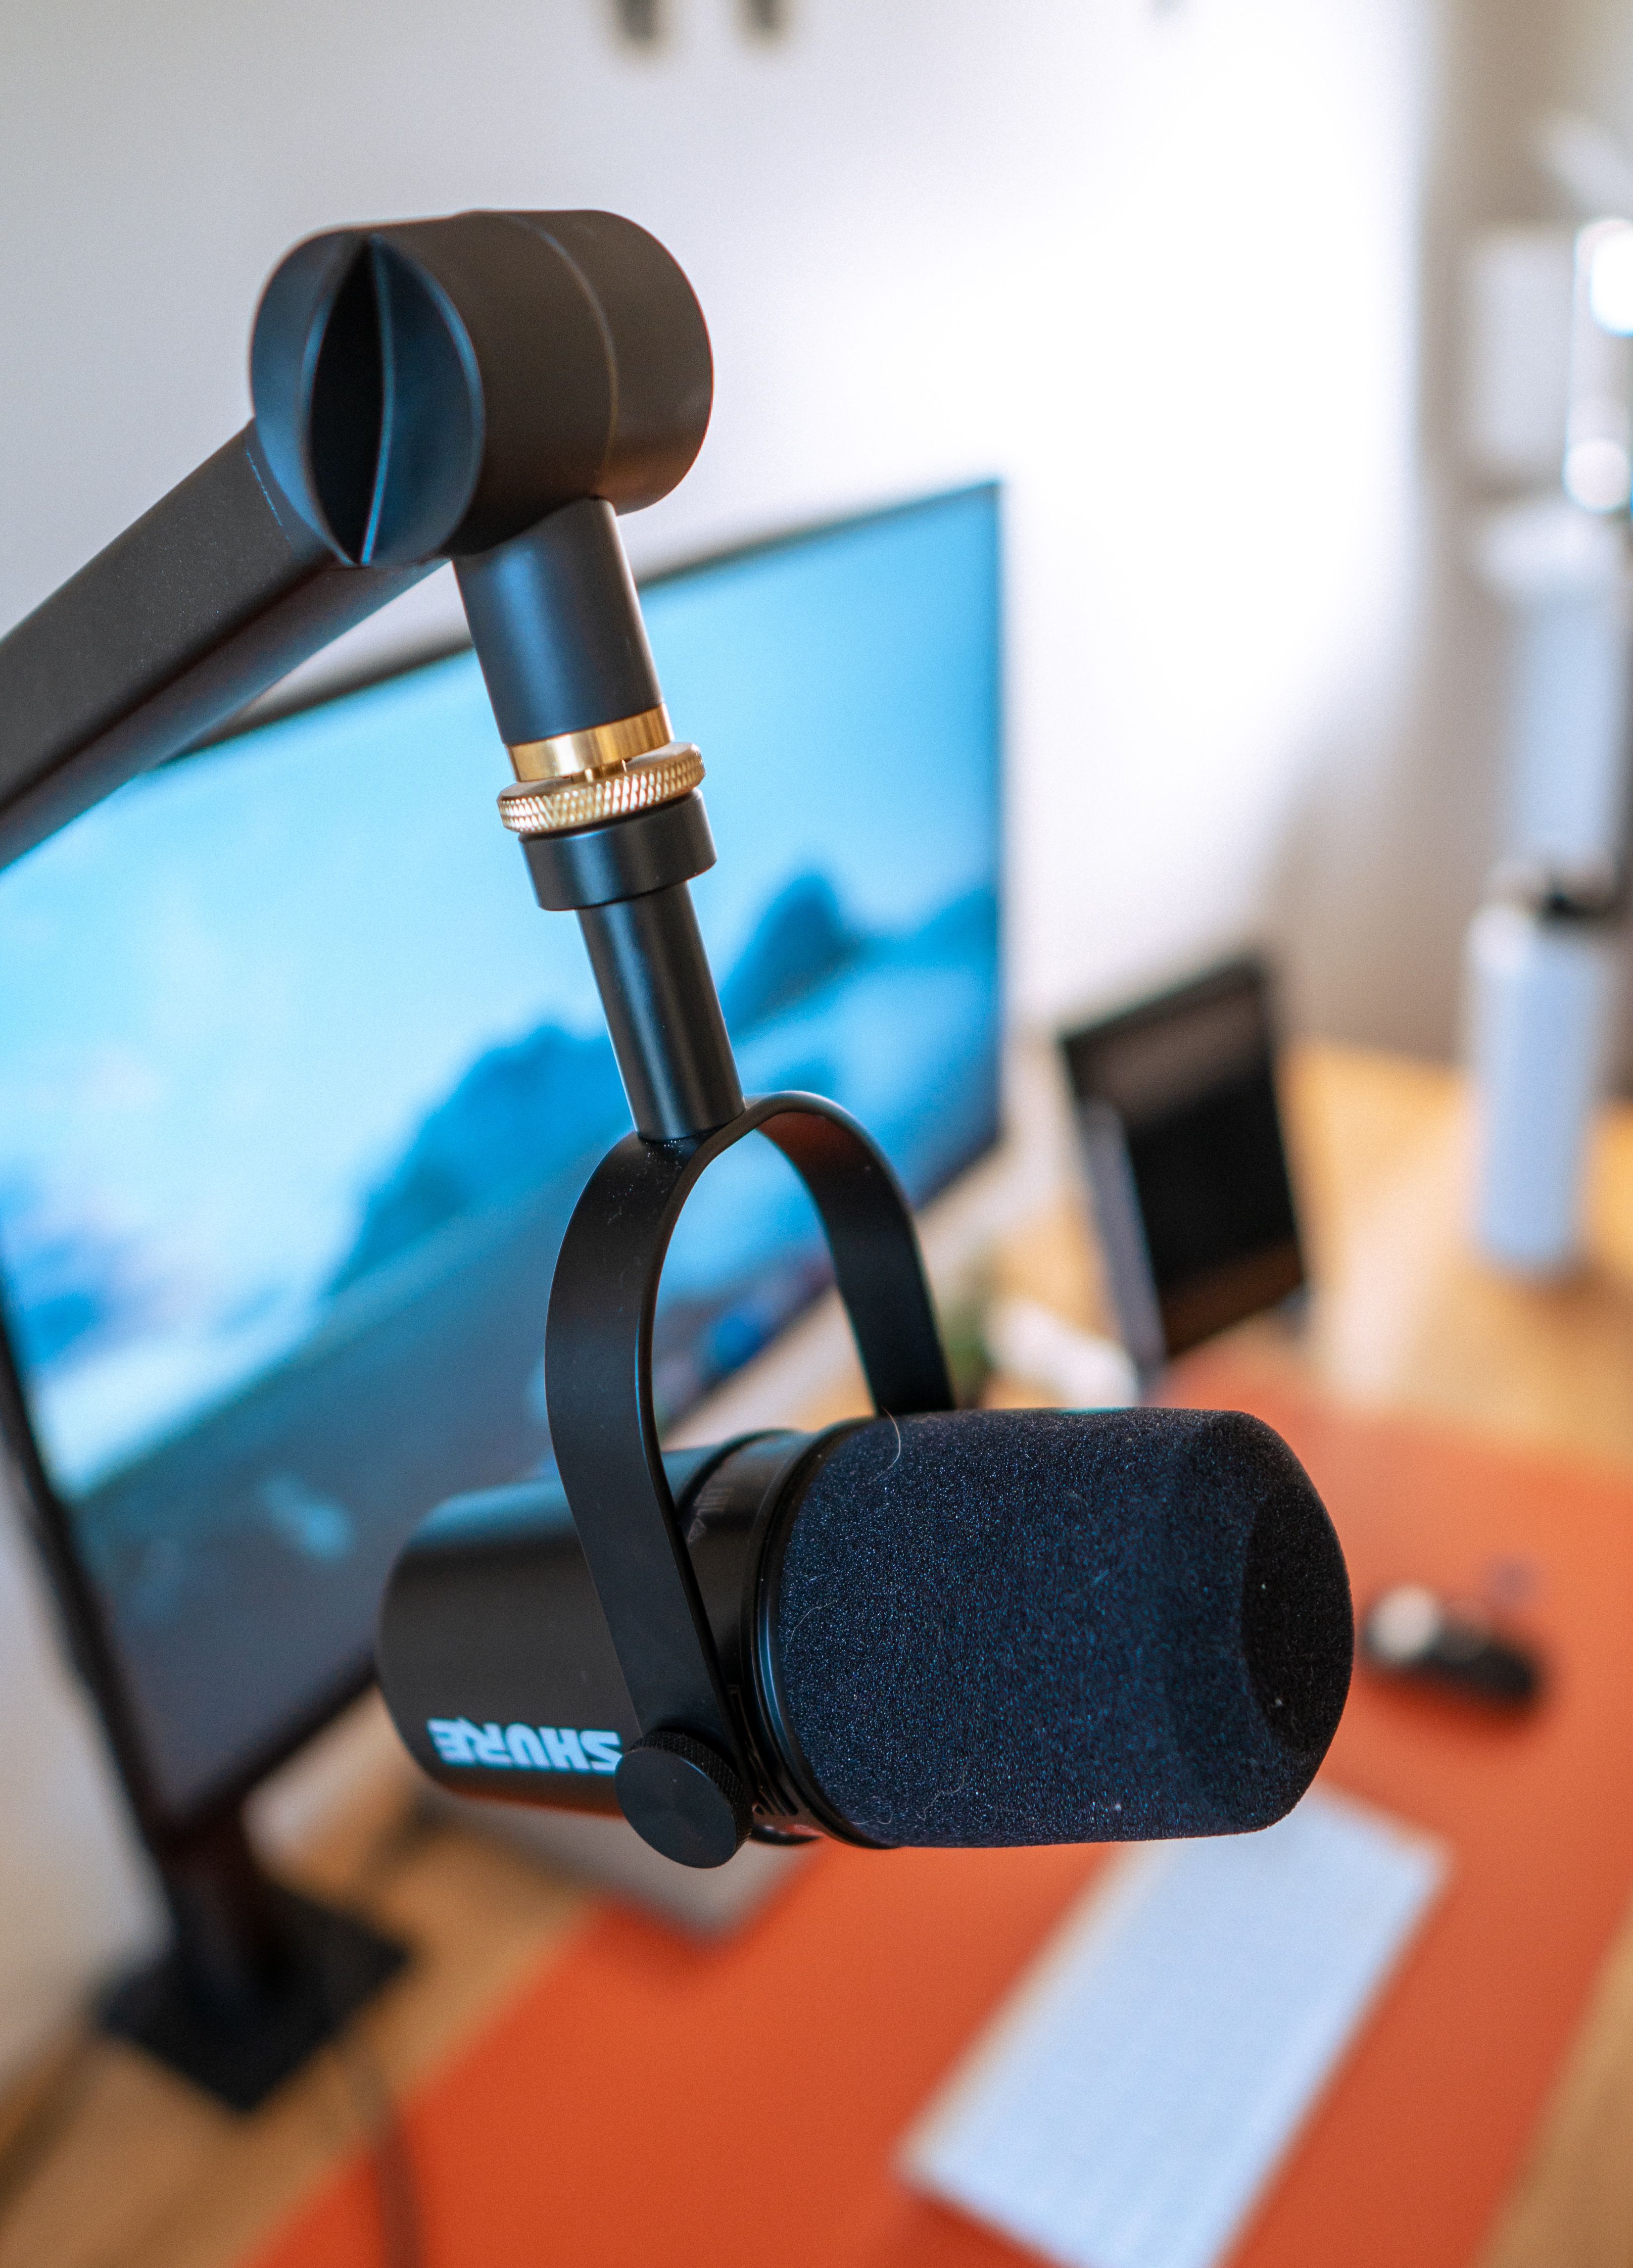
Shure MV7
As I noted in my tools report, when setting up at Drexel I decided to change things up and get the Shure MV7. There were a few reasons for this:
- I like Shure microphones in general (there is a reason they are the standard in a wide range of situations).
- The MV7 is lighter and less bulky (and takes less space in my field of vision on the boom arm).
- The online reviews I read indicated the MV7 is exceptional at sound isolation in untreated rooms like my office (the Yeti was already good in this regard, but I partly wanted to see what the Shure could do).
I haven’t regretted this decision at all — the MV7 is an excellent microphone. It is, however, more expensive (USB version lists for $249), and the USB controls are also harder to access (on the top of the mic, tilted away from you, instead of on the front).
I actually bought the MV7X model, which omits the USB interface in favor of only providing an XLR jack, and connected it to a Focusrite Vocaster One dedicated USB interface. With this setup, the control ergonomics on the microphone aren’t an issue because I control volume and hardware mute from the Vocaster sitting on my desk; this also allows me to directly connect my headphones to the interface without trying to run their cable to the back of the microphone, and gives me an easy hardware volume control for the headphones. The Vocaster is a great piece of kit; in particular, its auto-gain feature means I don’t have to worry about levels basically at all. I only have two complaints about the device:
- I can’t control or disable sidetone (the monitoring signal feeding from the microphone into your headphones to help you regulate your voice); since I use open-back headphones, I don’t really need sidetone and would just as soon turn it off, but no dice.
- The hardware mute does not synchronize with Zoom’s software mute, so I have to make sure both mutes are off in order to talk. Some hardware mute buttons can synchronize, but the drivers aren’t set up to do that with the Focusrite at this time.
I have an old Mackie Onyx Blackjack interface at home that I’m not really using, I might take that into the office and see how much I miss the auto-gain. We’ll see. I’m generally very happy with the MV7X + Vocaster setup, though; sounds great, doesn’t pick up much background noise, and auto-gain is my friend. This is a more advanced and expensive setup, though, so I would generally recommend the Yeti.
I mounted the MV7X on a scissor-style boom arm I found on Amazon. It uses a standard 1/4” threaded mount (the other standard size for mounting A/V gear).
Shure MV5
At home, my desk area is not as spacious, and I don’t really have room for a boom arm (or a large desktop microphone), so based on Wirecutter’s recommendation I bought the Shure MV5 at home. It stays out of the way, works pretty well, and the sound quality is pretty good even with it just sitting on the desk instead of being positioned more optimally near my mouth. It’s a great little piece of gear. Its hardware controls do have some ergonomic difficulties (both mute button and mute indicator are on the back, so I wouldn’t want to use them as my primary mute controls while on a call; the headphone level control is also a tiny knob that’s hard to reach, but I don’t use its headphone output anyway).
The MV5 is also less expensive than the Yeti, so if either space or funds are at a premium, I second Wirecutter’s recommendation that it’s a great little mic.
Sound on the Go
All of these microphones are for stationary office setups (well, you could take the MV5 with you, but I probably wouldn’t). On the go, you can still get some nice improvements.
When we all went home for COVID and I needed something better than my Surface’s built-in mic fast, I bought a Jabra Evolve 40, and continued to use it as my at-home calling headset after partially returning to the office. The sound quality (either recording or playback) is definitely not as good as the other equipment I recommend, but it’s pretty good, and for $100 you get both mic and headphones in one package that can fit in your laptop bag. It’s a pretty good deal for a first upgrade or for a secondary on-the-go setup.
I like to travel very light, however, so long-term I wanted something more compact to toss in my bag for on-the-go calls (and occasionally teaching from a hotel room). I use the now-discontinued Jabra Elite 85t for travel and as my primary earphones for my phone; the call quality is very good for true wireless earbuds, and they sound great listening to music as well. Unlike most wireless earbuds, they do not provide a complete seal, allowing some ambient noise through; I find it difficult to talk with my ears sealed, so this is very helpful for me. They also have active noise cancellation, a hear-through mode, and configurable sidetone, so I can dial them in to the sonic landscape I want for a particular situation. Very happy with them, and recommend them if you can find a pair; in general, though, Jabra makes pretty good on-the-go audio setups, so a newer Jabra set that matches your needs is likely to be pretty good (and the Elite 7 Pro’s bone conduction microphone capabilities look very interesting).
Cameras
MacBooks, iPhones, and iPads, as well as higher-end Android phones, all have very good cameras. However, if you are using an external monitor, or have a PC laptop, you probably want a webcam. A good camera makes it easier for others on the call or watching the video to see you, and also provides a better image for background removal (either with AI-powered virtual backgrounds or traditional chroma-key).
For an effective camera, I like to see a few things:
- Full HD (1080p) resolution — even though final video is most often in smaller windows on Zoom or shrunk down in a lecture video, having full HD gives me a high-resolution original for video editing, and lets me use the camera video at full frame for intros/outros and other contexts where I’m not combining with other visual elements (I render all my lectures and other recorded videos at full HD resolution).
- Clear, crisp image without significant noise or grain in normal office lighting. Supplementary lighting is useful for a quality boost in recordings that need to meet a higher quality standard, but I don’t want to need to shine extra lights at my face for all of my calls and utility recordings.
- Reasonably accurate and vibrant color. This will vary a lot; Apple does significant image processing to ensure that their products’ camera images look clear and vibrant. Other cameras often have fuzzier or less saturated colors, and a cheap off-brand webcam we bought for home use when name brands were hard to get in 2020 has truly terrible color reproduction.
I’ve used a few different external webcams in recent years:
- Logitech Brio 4K Pro (MSRP $200)
- Logitech C920s (MSRP $70)
- Anker PowerConf C200 (MSRP $60)
- Logitech C615 (MSRP $50)
I used a Brio as my primary webcam at Boise State from late 2021 onward. To save some startup funds at Drexel, I went with the C920s for my university office (Wirecutter’s former pick), and I recently bought the Anker C200, Wirecutter’s budget pick, for my home office. The C615 (or its predecessor) was the first webcam I bought at Boise State back in 2016.
Of these, the Brio has the best image quality by far, but at a steep price. I’m not very happy with the C920s; the image is pretty grainy, and it isn’t enough better than the less expensive cameras to really feel worth it. The Logi Capture app that is necessary to change camera settings, like the focal length, also doesn’t support modern Macs (there’s a new “Logi Tune” that I haven’t tried yet). For its price point, I’m very happy with the Anker, and the built-in shutter is pretty neat (and easier to use than the flip-cover on the C920s).
My recommendation, therefore, is to get the Anker C200 for a stationary office setup. I don’t have any experience with the newer, less expensive (MSRP $130) Brio cameras that Wirecutter recommends; they’re probably good, but it’s a question of whether they are worth the premium over the Anker. From time to time, I’ve considered the Razer Kiyo to get the built-in light, but haven’t found it necessary yet (and external lighting is pretty easy to set up).
On the go, just use your laptop camera, at least if it’s a MacBook. If you have a low-quality PC camera, there are portable webcams you can get to clip on a laptop display, but I have no idea how good they are. It would probably work just as well to put your phone on a tripod and use that, either by joining the call from the phone or using an app to use it as a webcam for your laptop (more on that in the next section).
Secondary Camera
That’s all for the primary webcam for capturing yourself for calls and lectures in a stationary office setting. A secondary camera can be quite useful, though:
- Document camera for hand-drawn diagrams, notes, etc., if that’s your style. I like analog media, so if I’m going to draw freehand to support a lecture or to show something in a meeting, I’d usually rather do it with a pen and paper under a document camera than with a tablet.
- Room or speaker capture for lectures, talks, panels, etc. Sometimes I do this for class, but if you’re organizing workshops or things like that it’s useful to be able to do DIY livestreaming, depending on the facilities the host venue makes available.
For these purposes, if you have a decent smartphone, it’s probably the best bet. Smartphone cameras are very good these days, especially in flagship iPhone models. You can use the phone directly to record video or join a Zoom call; I’ve often done this for recordings or workshop rooms. It’s also possible to use a phone as a webcam for your main computer to record or share on a video conference. There are a few ways to do this (my instructions here are for iPhone; similar thing are likely possible on Android, but I don’t know the software):
- Recent versions of macOS and iOS directly support using your iPhone as a webcam. This only works if you are signed in to both the computer and the phone with the same Apple ID; if, like me, you use separate Apple IDs for work and personal devices, this option isn’t available.
- Reincubate Camo is a very good application that lets you use your phone as a webcam (works for both iPhone and Android), connecting over the USB or Lightning cable. Its pricing is pretty reasonable, and they have educational discounts. The desktop app provides a dashboard that lets you control which camera it’s using along with other settings like zoom.
- Open Broadcaster Software provides a lot of camera and scene management capabilities, and can export its output as a virtual webcam that other applications can pick up. It’s really oriented towards livestreamers, but I find it useful when I need more live video composition or extra capture for recording. I most often use it as just a conduit for my phone camera: the Camera for OBS Studio iPhone app lets you connect your camera like Reincubate. The OBS desktop experience isn’t as easy-to-use as Camo, but it works well enough. It’s my current setup for phone-to-desktop, both for recording and to be a document camera in class since at least some classrooms in my department don’t have document cameras.
For mounting, I use the QuadLock system — it’s secure and durable, and seems less expensive overall than the competing system from Peak. It’s great for putting my phone on my bike, but also for video work. In my office, I have the tripod adapter on a second scissor boom arm for document camera work (it does need a ball mount to really work well, but connects to any standard 1/4” tripod screw). I also carry the tripod / selfie stick in my bag for portable recording or streaming.
Lighting
Lighting is crucial to high-quality photography and videography; above a baseline camera quality threshold (which is sadly not met by a lot of built-in or budget webcams), better lighting probably improves quality more than better cameras. There are a lot of usable, inexpensive lighting options on places like Amazon; LED light panels and ring lights can help a lot with clear face capture, although the glare and lighting intensity can be quite distracting if you aren’t used to it. Diffuse, indirect lighting is good and helps reduce glare, but the equipment is often more expensive.
Before Camtasia got support for AI-based background removal, I used chroma-key for my lecture videos, and that depends a lot on good, uniform lighting on the background. I bought a few cheap 5–7” USB-powered LED lighting panels, and they got the job done, but weren’t very good; if I were setting up that kind of lighting again, I would probably invest in a more expensive panel. I haven’t personally found ring lights to be very useful, but a lot of people use them.
I don’t have any dedicated lighting right now. If I were engaging in a significant buildout like our MOOC or my data science video class again, I would probably invest in lighting, but for Zoom calls and the odd recorded presentation or lecture, I find my office lights to be adequate.
Software
For videoconferencing, the software is pretty set: Zoom, Teams, Google Meet, or whatever your meeting is using.
For video recording and editing, I use Camtasia. Its user experience is heavily optimized for lecture and demonstration videos, so while it lacks a lot of the flexibility in terms of effects and editing that a more general package like Final Cut Pro or Adobe Premier would offer, it’s much easier to use for academics and has very good support for screen capture, including slides in videos, annotating the screen (e.g. putting in callouts to highlight important screen elements), and basic transitions and effects. I wouldn’t call it the most polished piece of software, but it gets the job done.
I don’t do a huge amount of editing on most of my videos, but do clean up significant false starts (and when I detect such a false start while recording, I’ll usually pause for several seconds and restart at a clear point like the beginning of the slide to give myself a clear point to edit in the final production). I usually also do a bit with how the slides and speaker videos are arranged (often replacing my speaker background with transparency or another image), and sometimes put in some intro/outro effects and a title card. TechSmith recently added virtual background replacement to Camtasia (in 2020, the only way to do it was with a green screen and chroma-key).
TechSmith Audiate is a very useful application that complements Camtasia. Audiate uses speech-to-text to transcribe your video’s audio. You can then edit the resulting text to clean up transcription errors (so the transcript can be used for higher-quality captions), but the really interesting thing is that you can delete text such as disfluencies and false starts. When you then export the project back to Camtasia, it includes an edit list to edit those bits out of the video track as well. Polishing up video in this way is very time-consuming when you try to do it directly in the video editor, but Audiate makes it practical, and lets you do the caption cleanup and video edit in one pass through your recording. If you want linguistically-clean recordings and don’t have budget for dedicated captioning and video editing labor, it’s a pretty good option. I don’t have precise measurements, but it probably takes me about 1–1.5 minutes of editing time per minute of video to polish a video with Audiate. The biggest downside to Audiate is its price, and while many universities have site license to Camtasia and/or SnagIt, Audiate site licenses are less common; I’m therefore not currently using it, but would get it again for a significant recording effort that demands the higher level of polish it affords.
I still want to provide good-quality captions for my videos, though, so I’m using MacWhisper for transcription and captioning. Its speech-to-text capabilities are quite accurate (better than anything else I’ve used, including Audiate), and its automatic segmenting logic is also very good (Audiate was not great at that, and also didn’t provide very good manual segmenting controls when last I used it). My usual captioning workflow is this:
- Export the audio track from Camtasia (Export → Audio Only).
- Import and transcribe the audio track with MacWhisper.
- Export the transcription to SRT-format subtitles.
- Import the subtitles back into Camtasia.
Any further edits, or partial exports, also correctly affect the subtitles after this. If there is some egregiously bad segmenting, I’ll sometimes tweak up the subtitles using Camtasia’s subtitle editor; while Camtasia’s editor is extremely tedious for drafting subtitles, it isn’t bad for light editing of subtitles that are already there.
I edit and export all of my videos at full HD (1920×1080) resolution, typically to a Local File that I then upload to Panopto, Kaltura, YouTube, Bunny, or wherever I am publishing the video in question. With the subtitles in place, Camtasia’s default for a local file export is to “burn” the subtitles into the video (called open captioning); I usually turn this off, re-export the subtitles to an SRT or VTT file, and upload them separately as a caption file to the video hosting service after uploading the video. This allows the viewer to control whether captions are displayed or not (closed captioning).
Headphones and Monitors
Ok, all of that is about creating and sharing the video. What viewing and listening during production, and hearing and seeing the people you’re calling with?
Most of this is covered by general thinking about what kind of monitor and headphones or speakers you want. I recommend getting a relatively good monitor so the color reproduction is decent; this makes it easier to catch significant color or lighting problems in your video. I use the 27” 4K ASUS ProArt monitor; this is a professional-grade color-calibrated monitor. Full color calibration isn’t necessary for basic educational videos (and I don’t do color-calibrated work), but you do want pretty good color calibration. Dell UltraSharp monitors are pretty good, I’ve used those in the past; you mostly want to stay away from the entry-level monitors (especially things costing $200 or less). I have never used an Apple Studio Monitor, but don’t think they’re likely worth the very expensive premium they command — a pro-level ASUS or Dell monitor is fine, and costs $300–500 instead of $1500 or whatever.
For audio, I strongly recommend a good pair of headphones. While some calling software has pretty good software echo cancellation these days, using headphones while on call means there isn’t echo that the software needs to try to cancel. If you like listening to music while working, a good set of headphones will also usually be higher-quality sound than laptop or cheap desktop speakers.
Selecting headphones is a pretty personalized decision. A few things to think about in identifying the ones that will work for you:
- How do you want them to fit on your ears? Besides earbuds, the two major designs are circumaural where the headphone pad goes around your ears, and supra-aural where the pad goes on your ears. There are also very different supra-aural designs; small, often circular headphones like the Evolve rest gently on your ears, mostly towards the center, while larger and heavier ones press more firmly on the outer parts of your earlobes. Your particular ear size and geometry will also make a significant difference on how they fit.
- Do you want sound isolation? Curcumaural and large supra-aural closed-back headphones block out a good deal of background noise to provide good isolation on the sound that you hear. They also block out a lot of your own voice, so it can sound weird to talk while wearing them. It’s also harder to calibrate your vocal volume since you can’t hear yourself very well (sidetone helps with this). Open-back headphones do not isolate: the back of the headphone (away from your ear) is open, usually a plastic or metal mesh, so ambient sound can come in. Earbuds are also available in both sound-isolating and non-isolating varieties, depending on whether they are designed to seal your ear, in addition to having or lacking active noise cancellation.
What you connect the headphones to also makes a significant difference. I’ve mentioned “sidetone” a few times; this refers to signal from the microphone going into your earpiece (in pro-audio terms, it’s usually called “monitoring”; sidetone is what it’s usually called in telephony). It’s helpful for regulating your vocal volume, since our brains rely on auditory feedback for that process. Sidetone or monitoring is especially important with sound-isolating or noise-cancelling headphones or earphones, because they block or cancel your natural voice feedback along with the background noise. Any of the USB microphones I mentioned above actually have a headphones jack on them as well, so you can plug in your headphones to get direct monitoring: microphone signal directly goes to the headphones without going through the digital processing or your computer, so you get zero-latency monitoring of your voice. USB audio interfaces for podcasting or recording, like the Vocaster I use, also provide this feature. You can configure your computer to do monitoring with the headphones plugged in to your headphones jack, but this introduces a small amount of latency (the computer digitally encodes the audio signal, processes it through its audio stack, and decodes it back into an audio signal for the headphones); we’re talking about milliseconds at most, but it’s noticeable.
I personally find it very difficult to talk naturally with sound-isolating headphones and have had mixed success relying entirely on sidetone, so I prefer to use circumaural open-back headphones at my desk and non-sealing earbuds on the go (I do use the earphones’ sidetone, and I’ve started to get used to it, but I don’t usually aim for my highest-quality recording in that setting). The specific gear I run:
Sennheiser HD600 open-back circumaural headphones in my university office (MSRP $450, I got them on sale for $250–300). Sennheiser is one of the best-known names in headphones (like Shure is the go-to for microphones), for good reason. I like using reference headphones (flat frequency response designed for professional monitoring and production), and the HD600 is in that category. This isn’t a particularly common taste, and is influenced by some time I spent doing audio production in my younger days; many people will probably find some of Sennheiser’s other models, like the Momentum or the HD560, to have a more familiar tonal quality.
I’m extremely happy with the HD600s — they are comfortable and secure while also feeling light on my head, and sound fantastic. They also fit comfortably around my ears.
Shure SRH1440 open-back circumaural headphones for my home office. These were the first open-back headphones I bought. I like their sound a lot (and they definitely sound better than anything I had purchased before), but the find the HD600 to both sound better and feel more comfortable (the SRH1440 is noticeably heavier and the pads are relatively thick, so it feels a bit like my head is in part of a football helmet).
Jabra Elite 85t earbuds for travel & on-the-go calling. I talked about these more under microphones, but they’re a great (although not cheap) set of day-to-day true-wireless earphones. They are unsealed, which is not common for this level of earphone, so I’m a lot more comfortable calling on them than on sealed earphones. They also have both sidetone and hear-through, making them quite versatile for a range of listening and calling situations. Most of the Jabra models (at least at the higher-end) have sidetone, so if you want sealed earphones, they have several options.
I no longer have the Jabra Evolve 40 (they were owned by the university), but as noted a couple times above, they’re a pretty good and semi-portable headset. I wouldn’t want to spend a lot of time listening to music on them, and they aren’t outstanding for listening while doing video editing and post-production, but they’re fine and worth the money.
One last headphone to note is the Sony MDR-7506. These are a professional-grade closed-back supra-aural headphone that Sony has had in production for over 30 years now. For my ears, they aren’t the most comfortable for extended periods of listening, but they sound great and are built to last. They also fold up into a relatively bulky bag for some portability (could toss them in a suitcase, but they’d take up quite a bit of a backpack). They’re a workhorse in the professional live sound world, and earn that reputation. If I started to do live sound work again for some reason, I would definitely buy a pair. In the office, I prefer the Sennheiser.
I don’t have particular recommendations for other types or formats of headphones. Sennheiser generally makes good headphones, so it’s hard to go wrong looking through their product lineup for something that meets your needs; Jabra is generally good as well, but is definitely more optimized for office use than music or video production.
Additional Bits
That covers most of it. There are a few other things that can be useful:
For extensive video editing, a shuttle controller is extremely useful. This lets you easily “scrub” backwards and forwards in the video to find the precise points to edit, and most of them provide additional buttons that you can map to keyboard shortcuts to perform common operations like splitting a video element or deleting selected video. Microsoft’s Surface Dial is also supposed to function as a shuttle, but I don’t have any experience with it.
Quick access to a mute button is helpful on calls. Zoom provides some kind of global keyboard shortcut to mute/unmute on most platforms. My keyboard is configurable, so I have set the volume knob to send that key signal when I press it in. In the office, I also have the hardware mute button on the Vocaster.
Video hosting can be a little trick. Both of my recent universities have contracted with a hosting platform (Kaltura at Drexel, Panopto at Boise State); that’s the best option for class videos, since it integrates with the LMS and also complies with the university’s data storage and access policies. For other videos such as talks or promotional videos, I often publish to YouTube for visibility and discoverability. When embedding video content in my website, however, I don’t like that option: it embeds Google code (and sends traffic to that page to Google), and I also don’t have any control over the ads or the post-video recommendations. This last point is especially important for educational videos, because I wouldn’t want the recommender sending viewers or students off to some other source I haven’t vetted and which I may be specifically avoiding. Since my site is relatively low-traffic, I use Bunny Stream to host embedded videos here. They don’t cost a lot, re-encode to a range of quality levels, and their player is pretty decent.
If you really want high-quality background replacement, then a good lighting setup and a green screen will produce better results than using the “virtual background” feature of Camtasia or the videoconference tool. However, for most academic purposes, it isn’t worth the extra cost, space, and hassle in my opinion.
Wrapup
That’s… probably more than you were hoping to read, but I hope it is helpful. Go out and make great videos!